
qCalc Input Output Table
qCalc Input and Output Table
- qCalc Input and Output Table
- 1. What these two tables are
- 2. Input table basics
- 3. Change column header names
- 4. Input table context menu
- 5. Output table context menu
- 6. Resize rows and columns
- 7. Limits for rows and columns
- 8. Pagination and page movement
- 9. Maximize and restore normal view
- 10. Upload workflows
- 11. Copy and download data
- 12. Common troubleshooting
- 13. Quick reference
1. What these two tables are
Input table
- Used to enter, edit, resize, and upload tabular data for calculations.
- Supports Edit and Display modes.
Output table
- Used to review calculation results.
- Read-only table with copy and download actions.
Both tables use page-based viewing with local pagination.
2. Input table basics
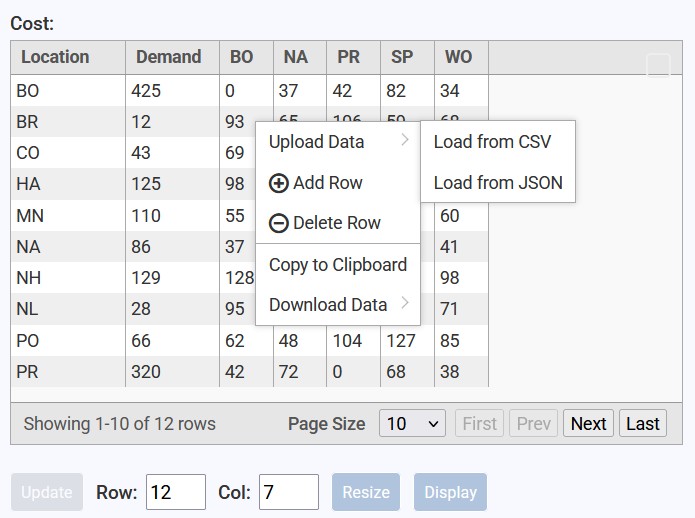
Fig: qCalc input table
2.1 Enter data in cells
- Ensure the table is in Edit mode.
- Click a cell.
- Type your value.
- Press Enter or click another cell.
When you change a cell, the Update button becomes enabled.
2.2 Keyboard and mouse behavior in Edit mode
The input table uses spreadsheet-style movement in Edit mode.
Keyboard: - Tab: move to next cell - Shift + Tab: move to previous cell - Enter: move to next row in the same column; at the bottom row, move to the top cell of the next column - Shift + Enter: move to previous row in the same column - Typing in an active cell editor replaces the full selected value
Mouse: - Click a cell to start editing - Double-click inside the editor to select the full cell value
Notes: - These keys and mouse actions apply local cell edits only. - Final apply/save is still done by clicking Update.
2.3 Save/apply edited table data
- Edit one or more cells.
- Click Update.
Use Update after cell edits, row changes, or header title changes.
2.4 Switch between Edit and Display mode
- Click the Edit or Display button below the table.
- In Edit mode:
- cell editing is enabled,
- header title editing is enabled,
- edit-only context menu options are available.
- In Display mode:
- table is read-only,
- only copy/download context menu actions remain.
3. Change column header names
Column header rename is available in Edit mode.
- Switch to Edit mode.
- Click the header title text you want to rename.
- Type the new title.
- Confirm by pressing Enter or clicking outside.
- Click Update to apply the new table state.
4. Input table context menu
Open the context menu by right-clicking a row.
4.1 Actions available in Edit mode
- Upload Data:
- Load from CSV
- Load from JSON
- Add Row
- Delete Row
- Copy to Clipboard
- Download Data:
- Download as CSV
- Download as JSON
- Download as HTML
4.2 Actions available in Display mode
- Copy to Clipboard
- Download Data:
- Download as CSV
- Download as JSON
- Download as HTML
5. Output table context menu
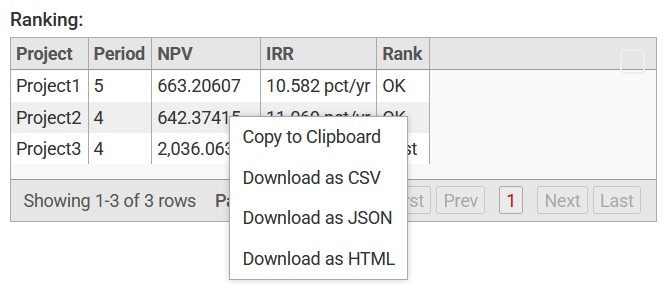
Fig: qCalc output table
Open the context menu by right-clicking a row.
Available actions: - Copy to Clipboard - Download as CSV - Download as JSON - Download as HTML
Output table is read-only and does not support editing/resizing controls.
6. Resize rows and columns
Row and column fields are shown below the input table.
- Enter target Row value.
- Enter target Col value.
- Click Resize.
Behavior: - Values are clamped to at least 1. - Resize triggers a full table refresh. - In Edit mode, use Update after additional edits.
7. Limits for rows and columns
Current enforced resize limits:
- Maximum columns: 125
- Maximum total cells: 50,000
- Maximum total rows = floor(50,000 / columns)
Examples:
- columns = 5 -> max rows = 10,000
- columns = 10 -> max rows = 5,000
- columns = 125 -> max rows = 400
Important behavior note:
- Resize operations are capped by the formula above.
- CSV import can load larger datasets than this limit.
8. Pagination and page movement
Both input and output tables are paginated.
Default settings: - Default page size: 10 rows - Page size options: 5, 10, 25, 50, 100, 250
How to move between pages: 1. Use the pagination controls at the bottom of the table. 2. Use next/previous page controls to move through data. 3. Change page size using the size selector.
Practical tips: - For large tables, keep smaller page sizes for faster interaction. - Increase page size when you want fewer page switches.
9. Maximize and restore normal view
Each table has a maximize toggle icon (square icon) at the top-right corner.
To maximize: 1. Click the square maximize icon. 2. Table opens in fullscreen mode.
To return to normal: 1. Click the same icon again, or 2. Press [Escape].
10. Upload workflows
10.1 Load from CSV (Input table, Edit mode)
- Right-click a row.
- Select Upload Data -> Load from CSV.
- Choose your file.
CSV import behavior: - First non-empty line is treated as header. - Remaining non-empty lines are treated as data rows. - Duplicate header names are auto-adjusted to unique internal fields.
10.2 Load from JSON (Input table, Edit mode)
- Right-click a row.
- Select Upload Data -> Load from JSON.
- Choose your JSON file.
After import: - Input table columns are synchronized with imported data. - Update button is enabled for applying further edits.
11. Copy and download data
- Copy entire table:
- Right-click row -> Copy to Clipboard
- Download current table content:
- CSV, JSON, or HTML from context menu
Use this in both input (especially Display mode) and output tables.
12. Common troubleshooting
- I edited a cell but result did not change:
-
Click Update after edits.
-
I requested 5000 rows but got fewer:
-
Resize is limited by max rows = floor(50000 / columns).
-
I switched mode and cannot edit:
- Ensure the button currently indicates Display (meaning table is in Edit mode).
13. Quick reference
- Edit data: Edit mode -> click cell -> type -> press [Tab]/[Enter] to move -> click [Update]
- Rename header: Edit mode -> click header title -> type -> click [Update]
- Resize: set Row and Col -> click [Resize]
- Row menu: right-click row
- Download: right-click row -> download format
- Maximize: click [Square icon]
- Restore: click icon again or [Escape]
- Paging: bottom pager controls and page-size selector